
Enjoy music in a better and more efficient way with a Class D audio amplifier.
Hardware Components:
| 1. | Resistor 6.8Kohm | x2 |
| 2. | Resistor 1kohm | x4 |
| 3. | Resistor 3.3kohm | x1 |
| 4. | LMC555CN_NOPB | x1 |
| 5. | Resistor 2K2ohm | x1 |
| 6 | LM7805CT_NOPB | x1 |
| 7. | IR2110PBF | x1 |
| 8. | IRF540NPBF | x2 |
| 9. | Header 2 Pins | x1 |
| 10. | LM393P | x1 |
| 11. | Resistor 330Kohm | x1 |
| 12. | Capacitor 1nF | x2 |
| 13. | AIML-0805-220K-T | x1 |
| 14. | BJT PNP Transistor | x2 |
| 15. | BD241C | x1 |
| 16. | 1N4148WT | x4 |
| 17. | Capacitor 10uF | x2 |
Software Tools:
- Inventhub
- Altium Designer
Class D Amplifier:
It is a digital amplifier also known as a switching amplifier. It uses the transistors and MOSFETs as electronic switches and performs switching between the supply rails. It has a modulator that amplifies the signal and shifts the sampling frequency to the highest frequency. That is why they are used in audio amplifiers to enhance the quality of sound. Using pulse width modulation, this amplifier converts the input (analog) signal to digital pulses. Their efficiency varies from 80% to 95%. The Class D amplifier is more efficient and less distorted than the class A, AB, and B amplifiers and it is an accurate choice for achieving good quality of sound in music.
Block diagram:
The analog signal is given as an input signal to the comparator or modulator. This modulator converts the analog signal to the digital pulse signal. This digital rectangular pulse has low amplitude when it passes through the low pass filter it will increase the amplitude of the original signal. At this stage, we are enhancing the quality of improving the sound level of the original signal. Then it will be converted again into an analog signal and a sound can be heard in the speakers. Now this time, you will be enjoying the music of better quality.

Design files:
I have created the symbols and footprints of all the components. Users do not need to design the symbols and footprints, they can download those parts from my components management library on Inventhub. This can help in reducing the errors in the design. I have uploaded my schematic file online on Inventhub for the users who want to implement my design. I can also view the changes I have made in my design by going to the ‘view changes’ tab. I can also collaborate with the people, they can comment on my design and can give suggestions to improve my design further.
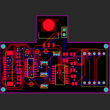
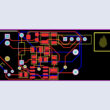
I have uploaded my PCB file on Inventhub, where I can view my boards in different layers and can focus on a specific layer by disabling the other layers. Users and manufacturers can easily view or download my design for the implementation.
PCB Fabrication:
I have created a release file of the project on Inventhub which contains all the design files including the schematic, and PCB files of my project in a ZIP file format. For the fabrication, I do not need to visit the manufacturer instead I can send him the release file of the project. He can easily download the files and can fabricate my PCB board without any error.
Bill of Materials:
I have created a list of components on Inventhub which contains the details of the manufacturer, supplier, manufacturer part number, pricing, and quantity. By just putting these details in the BOM file on Inventhub, it has calculated the total cost of the design automatically using the supply chain option. I can also view the datasheet of the component and can view its 3D model. For this project, our cost is almost $17.23 which is reasonable. Instead of visiting the component provider, I can send him this BOM file, he can download it in CSV file format and can deliver my components as per my design requirements.
To get complete how-to and detailed information on the project design and implementation visit this link: